vision pro 8000 installation guide
VisionPRO 8000 Installation Guide ー Article Plan (as of 04/22/2026 19:44:50)
This comprehensive guide details the VisionPRO 8000’s installation, configuration, and testing, ensuring optimal performance for both residential and small business HVAC systems.
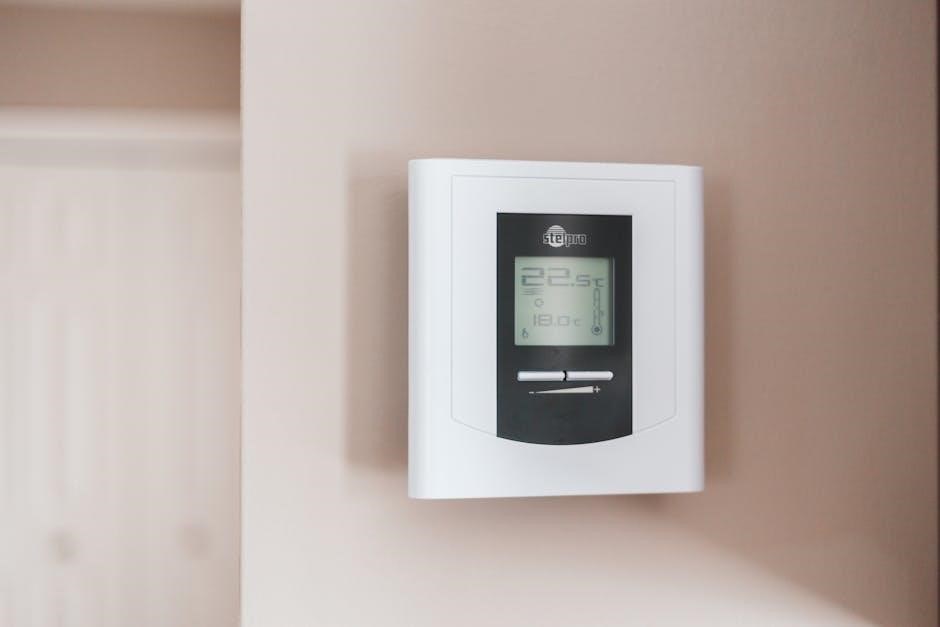
The VisionPRO 8000 is a programmable thermostat offering reliable climate control, designed for homes and businesses, optimizing comfort and energy efficiency through customizable temperature settings.
Overview of the Thermostat’s Capabilities
The Honeywell VisionPRO 8000 thermostat boasts a wide array of capabilities designed to provide precise and efficient climate control. It’s a programmable, multi-stage thermostat, meaning it can handle complex HVAC systems with multiple heating and cooling stages for enhanced comfort and energy savings.
This thermostat isn’t simply a temperature regulator; it’s a system manager. It allows for customized scheduling, enabling users to set different temperatures for various times of the day and days of the week. This feature significantly contributes to energy conservation by avoiding unnecessary heating or cooling when a space is unoccupied.
Furthermore, the VisionPRO 8000 offers advanced features like auto changeover, which automatically switches between heating and cooling modes based on indoor temperature, maintaining a consistent and comfortable environment. The installer system test functionality allows for thorough verification of proper operation after installation, ensuring all components are functioning correctly.
Key Features and Benefits
The Honeywell VisionPRO 8000 delivers numerous key features and benefits, starting with its programmable functionality, allowing tailored comfort schedules and substantial energy savings. Its multi-stage capabilities efficiently manage complex HVAC systems, optimizing performance and reducing energy waste. The intuitive interface simplifies operation for everyday users, while offering advanced settings for precise control.
A significant benefit is the automatic changeover feature, seamlessly switching between heating and cooling to maintain a consistent indoor temperature without manual adjustments. The integrated installer system test ensures correct installation and functionality, preventing potential issues and maximizing system efficiency.
Moreover, the thermostat’s compatibility with Wi-Fi (in certain models) enables remote control and monitoring via smartphone or tablet, providing convenience and peace of mind. Ultimately, the VisionPRO 8000 offers a blend of comfort, efficiency, and control, making it a valuable investment for any home or small business.
Target Users: Homes and Small Businesses
The Honeywell VisionPRO 8000 thermostat is ideally suited for a broad range of users, primarily homeowners and operators of small businesses seeking enhanced climate control and energy management. Its programmable features cater to those desiring customized comfort schedules, reducing energy consumption during unoccupied periods. Families will appreciate the ability to set back temperatures overnight or while at work/school.
Small businesses benefit from the thermostat’s ability to optimize heating and cooling based on operational hours, minimizing costs and creating a comfortable environment for employees and customers. The system’s compatibility with various HVAC systems makes it a versatile choice for diverse building types.
Furthermore, the ease of programming and intuitive interface make it accessible to users with varying levels of technical expertise, ensuring widespread adoption and maximizing the benefits of efficient climate control.

Pre-Installation Considerations
Before installation, verify HVAC system compatibility, gather necessary tools and materials, and prioritize safety by disconnecting power to the existing thermostat.
Compatibility Check: HVAC System Requirements
Ensuring compatibility is crucial for a successful VisionPRO 8000 installation. This thermostat supports a wide range of systems, including conventional and heat pump setups, but specific requirements must be met. The VisionPRO 8000 is designed for multi-stage heating and cooling systems, accommodating up to three stages of heating and two stages of cooling.
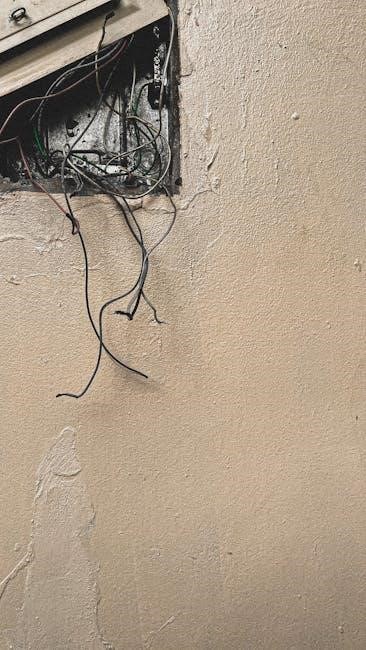
It’s essential to confirm your system doesn’t utilize line voltage (110V or 220V) as the VisionPRO 8000 operates on low voltage (24V). Systems with proprietary communication protocols might require an adapter. Verify your existing wiring includes a common (C) wire; if not, a C-wire adapter may be necessary.
The thermostat is compatible with gas, oil, and electric heating systems. Heat pump compatibility includes standard and reverse cycle configurations. Carefully review your existing system’s wiring diagram and specifications to confirm it aligns with the VisionPRO 8000’s requirements before proceeding with the installation.
Tools and Materials Needed for Installation
Proper preparation streamlines the VisionPRO 8000 installation process. You’ll require a few essential tools and materials to ensure a smooth and efficient setup. A small flathead and Phillips head screwdriver are fundamental for removing the old thermostat and connecting wires to the new base plate. Wire strippers are necessary for preparing the thermostat wires, ensuring clean connections.
A level is crucial for mounting the base plate straight, guaranteeing accurate temperature readings. A digital multimeter can be helpful for verifying power and voltage levels. You’ll also need wire labels to clearly identify each wire before disconnecting them from the old thermostat.
Beyond tools, ensure you have the VisionPRO 8000 thermostat itself, mounting screws (typically included), and potentially a C-wire adapter if your system lacks a common wire. A drill with appropriate bits might be needed depending on your wall material. Finally, have a pen and paper ready to document the existing wiring configuration.
Safety Precautions Before Starting
Prioritizing safety is paramount during the VisionPRO 8000 installation. Before commencing any work, always disconnect power to your HVAC system at the breaker box. This prevents electrical shock and potential damage to the equipment. Confirm the power is off using a non-contact voltage tester. Never work with electrical wiring if you are uncomfortable or unsure about any step.
Exercise caution when handling wiring, as even low-voltage circuits can pose a risk. Wear appropriate safety glasses to protect your eyes from debris. If you encounter any unexpected issues or are unsure about a particular connection, consult a qualified HVAC technician.
Be mindful of the surrounding environment and ensure adequate lighting. Keep children and pets away from the work area. Properly dispose of the old thermostat and any packaging materials; Following these precautions will help ensure a safe and successful installation.

Step-by-Step Installation Process
This section provides a detailed, sequential guide for physically installing the VisionPRO 8000, covering thermostat removal, wiring, and base plate mounting.
Removing the Old Thermostat
Before installing the VisionPRO 8000, carefully disconnect power to your HVAC system at the breaker box to prevent electrical shock. Photograph the existing thermostat’s wiring configuration – this is crucial for accurate reconnection to the new unit. Gently remove the thermostat cover, revealing the terminals and wiring.
Label each wire with the corresponding terminal designation before disconnecting them. Use the provided wire labels or create your own. Disconnect the wires one at a time, avoiding any accidental shorts. Once all wires are disconnected, carefully remove the old thermostat base plate from the wall.
Inspect the wall for any damage and repair as needed. Ensure the surface is clean and level for mounting the VisionPRO 8000 base plate. Remember safety first: double-check the power is off before proceeding!
Wiring the VisionPRO 8000: Terminal Identification
Carefully match the labeled wires from your old thermostat to the corresponding terminals on the VisionPRO 8000 base plate. Common terminals include R (power), C (common), W (heat), Y (cool), and G (fan). Refer to the wiring diagram included with your VisionPRO 8000 and the photograph you took of the old thermostat’s wiring.
Ensure each wire is securely inserted into the correct terminal. Loose connections can cause system malfunctions. If you have a multi-stage system, identify and connect the appropriate wires for each stage (e.g., W2 for second-stage heat, Y2 for second-stage cool).
Double-check all connections before proceeding. Incorrect wiring can damage your HVAC system. If you are unsure about any wiring connections, consult a qualified HVAC technician. A properly wired thermostat is essential for optimal performance and safety.
Mounting the Thermostat Base Plate
Once the wiring is complete and verified, carefully mount the VisionPRO 8000 base plate to the wall. Use the screws provided in the installation kit. Ensure the base plate is level for a professional appearance and proper display readability. If necessary, use the included wall anchors for secure mounting on drywall or other hollow surfaces.
Gently tuck any excess wire back into the wall opening, avoiding any pinching or strain on the connections. Align the base plate with the pre-drilled holes, if applicable, from the previous thermostat.
Tighten the screws securely, but do not overtighten, as this could damage the base plate or the wall. After mounting, verify that the base plate is firmly attached and does not wobble. This provides a stable foundation for the thermostat unit.

Initial Setup and Configuration
After mounting, configure system settings via the installer setup mode, defining system type and preferences for optimal display and automated operation.
Entering Installer Setup Mode
To begin customizing your Honeywell VisionPRO 8000 thermostat, you must first access the Installer Setup mode. This mode allows you to configure essential system parameters for proper operation. When the thermostat is newly powered on, it automatically enters Installer Setup. If power has been applied previously, or you need to re-enter this mode, follow these steps:
- Press the “Menu” button to access the main menu.
- Navigate to the “Installer” option using the up or down arrow buttons.
- Press “Select” to enter the Installer Setup menu.
- You may be prompted for a passcode; the default is often “1234” or “0000”.
Once inside, you’ll have access to various setup functions, including system type configuration and auto changeover settings. Remember to carefully review each option before making changes to ensure compatibility with your HVAC system.
System Type Configuration (Setup Function)
Accurate system type configuration is crucial for the VisionPRO 8000 to operate efficiently and effectively. Within the Installer Setup mode, locate the “System Type” function – its exact menu location may vary slightly depending on the model. This function allows you to define the characteristics of your heating and cooling equipment.
Options typically include choices for furnace type (gas, oil, electric), cooling type (central air, heat pump), and the number of stages for both heating and cooling. Carefully select the options that precisely match your HVAC system. Incorrect settings can lead to improper operation, reduced efficiency, and potential system damage.
Refer to your HVAC system’s documentation if you are unsure about its specifications. Proper configuration ensures the thermostat correctly controls your equipment, maximizing comfort and energy savings.
Auto Changeover Configuration (Setup Function 0300)
The Auto Changeover function (Setup Function 0300) automates the switch between heating and cooling modes, enhancing comfort and convenience. When enabled, the VisionPRO 8000 intelligently determines whether to activate heating or cooling based on the indoor temperature and the setpoint.
To utilize this feature effectively, ensure that the heating and cooling setpoints are separated by at least 2 degrees Fahrenheit. This prevents rapid cycling between modes, which can reduce efficiency and potentially shorten the lifespan of your HVAC equipment. The thermostat continuously monitors the temperature and makes seamless transitions.
Access Setup Function 0300 within the Installer Setup menu to enable or disable Auto Changeover. Consider your climate and personal preferences when deciding whether to use this automated feature.

System Testing and Troubleshooting
Thoroughly test heating, cooling, fan, and emergency heat functions after installation; the Installer System Test aids in identifying and resolving common setup issues.
Performing the Installer System Test
The Installer System Test is a crucial step to verify proper wiring and functionality of your Honeywell VisionPRO 8000 thermostat. To initiate the test, first enter Installer Setup mode. Once inside, repeatedly press the ‘t’ button until “Test” appears on the display. This will bring up the testing menu, allowing you to cycle through various system components.
Utilize the arrow buttons to navigate and change the test status for each system. You can individually test the heating, cooling, fan, and emergency heat functions. Remember that the available tests may vary depending on your specific thermostat model and the type of HVAC system installed. Carefully observe each test to ensure the system responds as expected.
Pay close attention to any error messages or unexpected behavior during the testing process. If issues arise, consult the troubleshooting section of this guide or the official Honeywell documentation. Once you’ve completed all tests and confirmed everything is working correctly, press ‘DONE’ to exit the test menu.
Testing Heating, Cooling, Fan, and Emergency Heat
After completing the Installer System Test, dedicate time to thoroughly test each function of your VisionPRO 8000. Begin with the heating system; verify the heat source activates and delivers warm air when the thermostat calls for heat. Next, test the cooling system, ensuring cool air is produced upon demand. Observe the airflow and temperature changes to confirm proper operation.
The fan function should be tested in both ‘Auto’ and ‘On’ modes. In ‘Auto’, the fan should only run during heating or cooling cycles. In ‘On’, the fan should operate continuously. Finally, test the emergency heat function, if applicable, to confirm it engages when the primary heat source is unavailable.
Document any discrepancies or issues encountered during testing. Consistent and reliable operation of each function is vital for optimal comfort and energy efficiency. Address any problems before proceeding to the programming stage.
Common Installation Issues and Solutions
During VisionPRO 8000 installation, several common issues may arise. A frequent problem is incorrect wiring, leading to systems not functioning correctly. Double-check all terminal connections against your HVAC system’s wiring diagram. Another issue is insufficient power; ensure the thermostat receives adequate voltage, potentially requiring a C-wire adapter.
If the thermostat doesn’t enter installer setup, verify the power supply and wiring. Communication failures between the thermostat and HVAC system can occur; confirm compatibility and wiring integrity; Incorrect system type configuration can also cause problems; revisit Setup Function to ensure accurate settings.
For unresponsive displays, check the battery (if applicable) and power connections. If issues persist, consult the Honeywell support website or a qualified HVAC technician for further assistance. Careful troubleshooting will ensure a smooth installation.
Programming the VisionPRO 8000
Customize your comfort by setting the date, time, and creating personalized schedules with programmable temperature settings for optimal energy efficiency and convenience.
Setting Date and Time
Accurate date and time settings are crucial for proper scheduling and operation of your Honeywell VisionPRO 8000 thermostat. To begin, ensure the thermostat is powered on and displaying the main screen. Navigate to the menu options; typically, this is accessed by pressing the ‘Menu’ or ‘Settings’ button on the thermostat interface.
Within the menu, locate the ‘Date and Time’ settings. You may need to scroll through the options using the up and down arrow buttons. Once selected, you’ll be prompted to adjust the year, month, and day. Use the arrow buttons to increment or decrement the values until they reflect the current date.

Following the date configuration, proceed to set the time. Adjust the hour and minute settings similarly, ensuring you select the correct AM or PM designation. After confirming both the date and time, save your changes. The thermostat will then utilize these settings for all scheduled programs and time-based functions, ensuring consistent and reliable climate control.
Creating and Editing Schedules
The VisionPRO 8000’s programmable features allow for customized comfort and energy savings through scheduled temperature adjustments. Access the scheduling function via the ‘Menu’ or ‘Program’ button on the thermostat. You’ll typically find options for creating separate schedules for weekdays and weekends, or even individual days.
To create a new schedule, select a time period (e.g., Wake, Leave, Return, Sleep) and assign a desired temperature setting for that period. Repeat this process for each time period throughout the day. Editing existing schedules is equally straightforward; simply select the period you wish to modify and adjust the time or temperature as needed.
The thermostat interface allows for easy copying of schedules to multiple days, streamlining the setup process. Remember to save your changes after creating or editing any schedule to ensure the new settings are implemented. Properly configured schedules optimize comfort and reduce energy consumption.
Understanding Programmable Temperature Settings
The VisionPRO 8000 utilizes programmable temperature settings to automate your home’s climate control, maximizing comfort and minimizing energy waste. These settings define the desired temperature at specific times of the day, creating a personalized heating and cooling schedule. Understanding these settings is crucial for efficient operation.
The thermostat typically offers four primary programmable periods: Wake, Leave, Return, and Sleep; Each period allows you to set a unique temperature; For example, a lower temperature during ‘Sleep’ and ‘Leave’ periods can significantly reduce energy consumption. The ‘Hold’ function temporarily overrides the programmed schedule, maintaining a constant temperature until canceled.
Furthermore, the ‘Temporary Override’ allows for a one-time adjustment without affecting the programmed schedule. Familiarize yourself with these options to tailor the thermostat to your lifestyle and optimize energy savings. Careful programming ensures consistent comfort and reduced utility bills.